Introduction
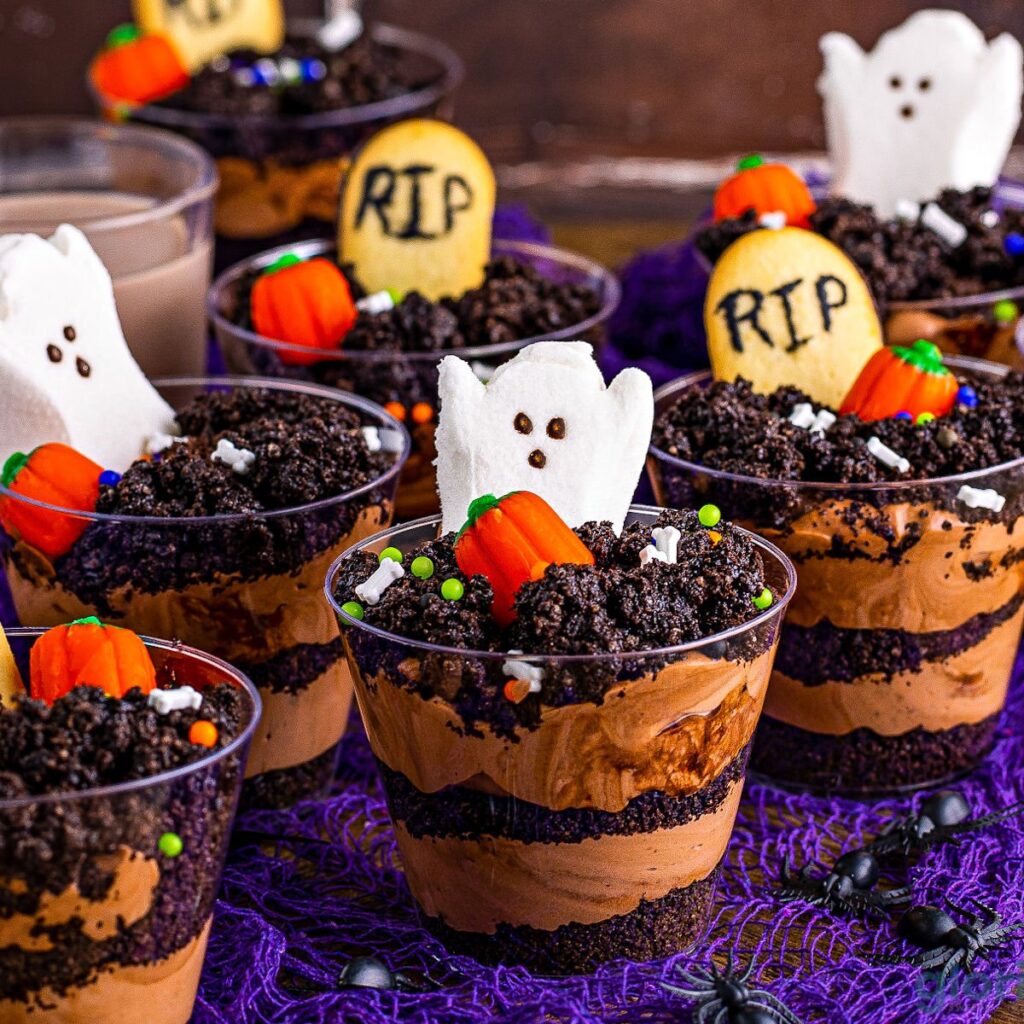
Halloween isn’t complete without spooky treats that are as fun to look at as they are to eat. Haunted Graveyard Chocolate Pudding Cups with Cookie Tombstones are a simple, no-bake dessert that brings the eerie charm of a haunted graveyard to your Halloween table. Layers of rich chocolate pudding and crushed cookies form the “dirt,” while cookies decorated as tombstones rise from the cups. Add some candy pumpkins, gummy worms, or edible grass, and you have a creepy yet delicious graveyard scene!
This is a fantastic dessert for parties, especially because kids and adults both love the playful look and sweet taste. Plus, it requires very little cooking—just assembly and decoration—making it a stress-free Halloween dessert.
Why I Love This Recipe
I love this recipe because it combines ease and creativity. The pudding base is creamy, chocolatey, and satisfying, while the crushed cookies give a fun “dirt” texture. What really makes me adore it is how customizable it is—you can decorate each cup differently, add tombstones with funny inscriptions, or make them extra spooky with gummy worms.
It’s also a recipe that kids can help with, from crushing the cookies to decorating their own haunted cups. It’s a fun, interactive dessert that doubles as an edible craft project.
Why This is a Must-Try Dish
This dessert is a must-try because:
- No-bake and easy – Minimal effort for maximum effect.
- Kid-approved – Fun, hands-on, and perfect for family cooking.
- Party-perfect – Looks spooky and creative, but can be made in advance.
- Customizable – You can adapt decorations to your spooky theme.
- Delicious – Chocolate pudding and cookies are a timeless combination.
Preparation & Cooking Time
- Preparation Time: 20 minutes
- Chill Time: 30 minutes (optional, for firmer pudding)
- Total Time: 20–50 minutes
- Servings: 6 pudding cups
- Calories: ~280–320 calories per serving (varies with toppings)
Cuisine & Course
- Cuisine: American, Halloween-themed
- Course: Dessert
Ingredients
For the Cups:
- 1 box (3.9 oz / 110 g) instant chocolate pudding mix
- 2 cups cold milk (or dairy-free milk substitute)
- 1 cup whipped topping (Cool Whip or whipped cream)
- 15 chocolate sandwich cookies (Oreos), crushed
For the Decoration:
- 6 rectangular cookies (like Milano, graham crackers, or shortbread) – for tombstones
- Black decorating gel or melted chocolate – for writing on tombstones
- Gummy worms, candy pumpkins, or edible grass – for garnish
Simple Directions
- Prepare pudding according to package instructions. Fold in whipped topping.
- Crush cookies to resemble “dirt.”
- Layer pudding and crushed cookies in cups.
- Write “RIP” or spooky messages on rectangular cookies to make tombstones.
- Insert tombstones into each pudding cup and decorate with candy.
Step-by-Step Recipe Preparation
- Make the Pudding:
- In a bowl, whisk together the chocolate pudding mix and cold milk for about 2 minutes until thickened.
- Gently fold in whipped topping for extra creaminess.
- Prepare the Dirt:
- Place chocolate cookies in a ziplock bag and crush them with a rolling pin (or pulse in a food processor).
- Assemble the Cups:
- Spoon a layer of pudding into each cup, then sprinkle crushed cookies on top.
- Repeat layers until the cups are filled, finishing with crushed cookie “dirt” on top.
- Make the Tombstones:
- Using decorating gel or melted chocolate, write spooky messages like “RIP,” “BOO,” or tiny skull drawings on each rectangular cookie.
- Decorate the Graveyard:
- Insert tombstone cookies into each pudding cup.
- Garnish with gummy worms, candy pumpkins, or edible grass to complete the graveyard scene.
How to Serve
Serve chilled in clear plastic cups or glass jars so the layers of pudding and “dirt” are visible. Add a small spoon for easy eating. These are perfect for Halloween dessert tables, party trays, or even as a fun after-school snack for kids.
Additional Recipe Tips
- Use clear cups so the layers show off nicely.
- Make pudding ahead of time and refrigerate, but add decorations just before serving.
- For extra chocolate flavor, add mini chocolate chips in the layers.
- Let kids decorate their own graveyard cups for a party activity.
Variations
- Dairy-free/Vegan: Use almond milk and dairy-free pudding mix, with coconut whipped topping.
- Healthier option: Use sugar-free pudding mix and light whipped topping.
- Pumpkin twist: Add pumpkin spice to the pudding for a fall flavor.
- Marshmallow ghosts: Pipe little whipped cream ghosts with chocolate chip eyes on top.
Freezing & Storage
- Refrigerator: Store decorated pudding cups in the fridge for up to 2 days.
- Freezer: Not recommended, as pudding and cookies lose texture after thawing.
Special Equipment Needed
- Mixing bowl & whisk
- Ziplock bag + rolling pin (or food processor)
- Clear cups (plastic or glass)
- Piping bag or toothpick for decorating tombstones
Conclusion
Haunted Graveyard Chocolate Pudding Cups with Cookie Tombstones are the ultimate no-bake Halloween dessert—easy, fun, and spooky enough to steal the spotlight at any party. They’re a creative blend of chocolatey goodness and festive decoration, making them loved by both kids and adults. With their edible tombstones and creepy crawly garnishes, these cups will turn your dessert table into a haunted graveyard!
Haunted Graveyard Chocolate Pudding Cups with Cookie Tombstones
Halloween isn’t complete without spooky treats that are as fun to look at as they are to eat. Haunted Graveyard Chocolate Pudding Cups with Cookie Tombstones are a simple, no-bake dessert that brings the eerie charm of a haunted graveyard to your Halloween table
Ingredients
For the Cups:
For the Decoration:
Instructions
-
Make the Pudding : In a bowl, whisk together the chocolate pudding mix and cold milk for about 2 minutes until thickened. Gently fold in whipped topping for extra creaminess.
-
Prepare the Dirt : Place chocolate cookies in a ziplock bag and crush them with a rolling pin (or pulse in a food processor).
-
Assemble the Cups : Spoon a layer of pudding into each cup, then sprinkle crushed cookies on top. Repeat layers until the cups are filled, finishing with crushed cookie “dirt” on top.
-
Make the Tombstones : Using decorating gel or melted chocolate, write spooky messages like “RIP,” “BOO,” or tiny skull drawings on each rectangular cookie.
-
Decorate the Graveyard : Insert tombstone cookies into each pudding cup. Garnish with gummy worms, candy pumpkins, or edible grass to complete the graveyard scene.