Introduction
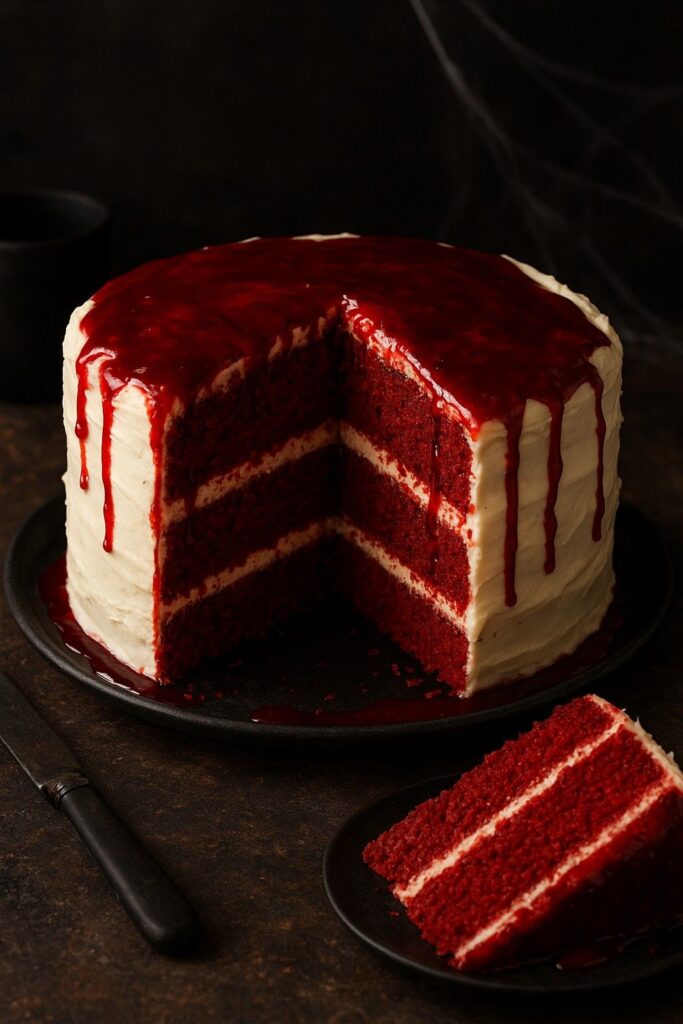
When it comes to Halloween desserts that are both spooky and delicious, nothing makes a statement quite like a Bloody Red Velvet Cake with Cream Cheese Frosting. This classic cake gets a chilling makeover—deep crimson layers of moist red velvet cake, stacked high and smothered in silky cream cheese frosting, finished with a dramatic “blood drip” made from red raspberry or strawberry sauce.
The contrast of bright white frosting against the eerie red “blood” makes it a haunting centerpiece for any Halloween party. Not only does it look spooky, but it’s also irresistibly soft, rich, and tangy—a dessert that tastes just as good as it looks.
Why I Love This Recipe
I love this recipe because it combines classic elegance with creepy fun. Red velvet cake on its own is already a timeless treat, but adding the bloody drip makes it festive, theatrical, and party-ready. The tangy cream cheese frosting balances the sweetness of the cake perfectly, while the raspberry or strawberry “blood” adds a fruity touch that surprises the palate.
What I love most is how versatile it is—you can make it as a tall layer cake, spooky cupcakes, or even a sheet cake decorated like a “graveyard.” It’s the kind of dessert that always gets guests talking, snapping pictures, and coming back for seconds.
Why This is a Must-Try Dish
This is a must-try recipe because:
- Stunning presentation – It’s a showstopper on any Halloween dessert table.
- Flavor-packed – The cake is moist and tender, the frosting rich and tangy, and the raspberry “blood” adds depth.
- Crowd-pleasing – Both adults and kids are amazed by its spooky look and delicious taste.
- Versatile – Works for Halloween, gothic-themed parties, or even Valentine’s Day (bloody heart theme!).
- Make-ahead friendly – You can bake the cake layers in advance and decorate later.
Preparation & Cooking Time
- Preparation Time: 25 minutes
- Baking Time: 30 minutes
- Cooling & Decorating Time: 45 minutes
- Total Time: ~1 hour 40 minutes
- Servings: 12 slices
- Calories: ~420 calories per slice (varies with frosting & sauce)
Cuisine & Course
- Cuisine: American
- Course: Dessert, Celebration Cake
Ingredients
For the Red Velvet Cake:
- 2 ½ cups all-purpose flour
- 1 ½ cups granulated sugar
- 1 tsp baking soda
- 1 tsp salt
- 1 tsp cocoa powder
- 1 ½ cups vegetable oil
- 1 cup buttermilk (room temp)
- 2 large eggs (room temp)
- 2 tbsp red food coloring (liquid or gel)
- 1 tsp vanilla extract
- 1 tsp white vinegar
For the Cream Cheese Frosting:
- 16 oz (450 g) cream cheese, softened
- 1 cup unsalted butter, softened
- 4 cups powdered sugar
- 2 tsp vanilla extract
For the “Blood Drip”:
- ½ cup raspberry or strawberry jam (seedless)
- 2 tbsp water
- A few drops of red food coloring (for deeper effect, optional)
Simple Directions
- Bake moist red velvet cake layers.
- Prepare cream cheese frosting.
- Stack and frost cake.
- Make raspberry “blood” sauce.
- Drizzle sauce over cake to create a gory effect.
Step-by-Step Recipe Preparation
Step 1: Make the Cake Batter
- Preheat oven to 350°F (175°C). Grease and flour two 9-inch round cake pans.
- In a bowl, sift together flour, sugar, baking soda, salt, and cocoa powder.
- In another bowl, whisk oil, buttermilk, eggs, red food coloring, vanilla, and vinegar.
- Slowly add dry ingredients into wet ingredients, mixing until smooth.
Step 2: Bake the Cake
- Divide batter evenly into prepared pans.
- Bake for 28–32 minutes or until a toothpick inserted comes out clean.
- Cool cakes completely before frosting.
Step 3: Prepare the Frosting
- Beat cream cheese and butter until smooth and fluffy.
- Add powdered sugar gradually, mixing well.
- Stir in vanilla extract until creamy.
Step 4: Assemble the Cake
- Place one cake layer on a serving plate. Spread frosting evenly on top.
- Place the second cake layer over it and frost the entire cake with a thin “crumb coat.”
- Chill for 20 minutes, then apply a final thick frosting layer.
Step 5: Make the Blood Drip
- In a small saucepan, heat jam and water until smooth.
- Stir in food coloring if needed. Let it cool slightly.
- Drizzle the sauce around the top edge of the cake, letting it drip down the sides.
Step 6: Final Touches
Decorate with edible knives, candy bones, or a chocolate “bloody handprint” for extra spookiness.
How to Serve
Slice with a dramatic cake knife for the full horror effect! Serve chilled or at room temperature. Pair with coffee, tea, or milk for balance. Perfect for Halloween parties, themed birthdays, or gothic dinners.
Additional Recipe Tips
- Use gel food coloring for a more vibrant red without altering the texture.
- Chill cake layers before frosting to avoid crumbs mixing into frosting.
- For extra depth, add ½ tsp espresso powder to the cocoa.
- Use a squeeze bottle for more controlled “blood” drips.
Variations
- Cupcakes: Make red velvet cupcakes topped with cream cheese frosting and “bloody” drizzle.
- Black velvet version: Use black cocoa powder and black food coloring for a spooky twist.
- Cheesecake layer: Add a baked cheesecake layer between cake layers for decadence.
- Gluten-free: Substitute flour with a 1:1 gluten-free baking mix.
Freezing & Storage
- Refrigerator: Store covered cake in the fridge for up to 4 days.
- Freezer (Cake Layers Only): Wrap unfrosted layers in plastic wrap and freeze up to 2 months.
- Frosting: Can be stored separately in the fridge for 5 days.
- Avoid freezing with “blood drip” already added—it may weep when thawed.
Special Equipment Needed
- Two 9-inch round cake pans
- Electric mixer (hand or stand)
- Offset spatula for frosting
- Saucepan for jam drizzle
- Cake stand or serving platter
Conclusion
The Bloody Red Velvet Cake with Cream Cheese Frosting is the ultimate Halloween showstopper—decadent, chilling, and picture-perfect. Its bold colors, spooky presentation, and irresistible flavors make it a dessert that both thrills and satisfies. Whether you’re hosting a haunted party or just want to surprise your family with a frightful treat, this cake will leave everyone in awe—and reaching for another slice.
Bloody Red Velvet Cake with Cream Cheese Frosting
When it comes to Halloween desserts that are both spooky and delicious, nothing makes a statement quite like a Bloody Red Velvet Cake with Cream Cheese Frosting.

Ingredients
For the Red Velvet Cake:
For the Cream Cheese Frosting:
For the “Blood Drip”:
Instructions
-
Step 1: Make the Cake Batter : Preheat oven to 350°F (175°C). Grease and flour two 9-inch round cake pans. In a bowl, sift together flour, sugar, baking soda, salt, and cocoa powder. In another bowl, whisk oil, buttermilk, eggs, red food coloring, vanilla, and vinegar. Slowly add dry ingredients into wet ingredients, mixing until smooth.
-
Step 2: Bake the Cake : Divide batter evenly into prepared pans. Bake for 28–32 minutes or until a toothpick inserted comes out clean. Cool cakes completely before frosting.
-
Step 3: Prepare the Frosting : Beat cream cheese and butter until smooth and fluffy. Add powdered sugar gradually, mixing well. Stir in vanilla extract until creamy.
-
Step 4: Assemble the Cake : Place one cake layer on a serving plate. Spread frosting evenly on top. Place the second cake layer over it and frost the entire cake with a thin “crumb coat.” Chill for 20 minutes, then apply a final thick frosting layer.
-
Step 5: Make the Blood Drip : In a small saucepan, heat jam and water until smooth. Stir in food coloring if needed. Let it cool slightly. Drizzle the sauce around the top edge of the cake, letting it drip down the sides.
-
Step 6: Final Touches : Decorate with edible knives, candy bones, or a chocolate “bloody handprint” for extra spookiness.


