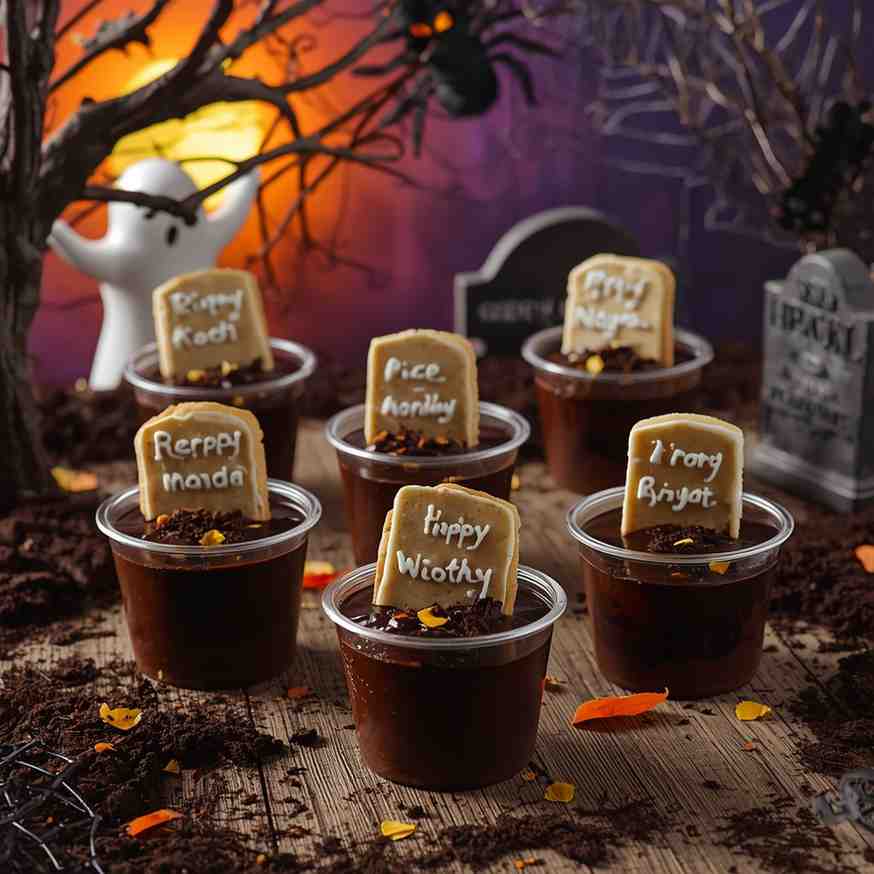
These Haunted Graveyard Chocolate Pudding Cups with Cookie Tombstones are the perfect blend of creepy and delicious — a must-have treat for your Halloween celebrations! Layers of rich, creamy chocolate pudding, crushed chocolate cookies (“dirt”), and adorable cookie tombstones create a fun and eerie mini dessert that looks like a spooky graveyard scene straight out of a Halloween movie.
This recipe is completely no-bake, easy to assemble, and ideal for both kids and adults. Each cup is like a tiny edible graveyard, topped with candy pumpkins, gummy worms, or bones for extra frightful fun. Whether you’re hosting a Halloween party, bringing a festive dessert to a potluck, or just celebrating with family, these pudding cups bring smiles (and a few playful scares) to every table.
Why I Love This Recipe
I love this recipe because it perfectly combines creativity, nostalgia, and flavor. It’s one of those desserts that not only tastes amazing but also lets you get artsy — from writing “R.I.P.” on the cookie tombstones to decorating with candies and gummy worms.
It’s also an incredible activity for kids — they can assemble and decorate their own pudding graves, which makes it both a treat and a craft project. Plus, the textures are divine: creamy pudding, crunchy cookie crumbs, and sweet candy toppings in every spoonful.
And best of all? It requires no oven, no mixer, and almost no effort, yet looks like something out of a professional Halloween display.
Why It’s a Must-Try Dish
You simply must try this spooky pudding dessert because:
- It’s quick and foolproof, perfect for last-minute Halloween prep.
- It’s versatile — you can make it dairy-free, gluten-free, or vegan with simple swaps.
- It’s fun for all ages, from toddlers to adults.
- It’s visually stunning — looks elaborate but is secretly very easy.
- It’s make-ahead friendly, saving time on your busy Halloween night.
Recipe Overview
- Preparation Time: 20 minutes
- Cooking Time: 0 minutes (no-bake)
- Total Time: 20 minutes
- Servings: 8 pudding cups
- Calories: ~280 kcal per serving
- Course: Dessert
- Cuisine: American (Halloween-themed)
Ingredients
For the Chocolate Pudding:
- 1 box (3.9 oz / 110 g) instant chocolate pudding mix
- 2 cups cold milk (whole or 2%)
- 1/2 cup whipped topping (like Cool Whip or homemade whipped cream)
For the “Dirt” Layer:
- 20 chocolate sandwich cookies (like Oreos), crushed into crumbs
For the Tombstones & Decorations:
- 8 oval or rectangular cookies (Milano, Biscoff, or ladyfingers work great)
- 1/4 cup melted chocolate or black decorating gel (for writing “R.I.P.”)
- Candy pumpkins, gummy worms, bone-shaped candies, or green coconut flakes for grass
- Optional: Crumbled brownies for extra texture
For Serving:
- 8 small clear cups or dessert jars (6–8 oz each)
Cooking Directions
Step-by-Step Preparation Method
Step 1: Make the Chocolate Pudding
- In a medium bowl, whisk the chocolate pudding mix and cold milk together for 2 minutes until smooth and thickened.
- Gently fold in the whipped topping to make it lighter and creamier.
- Refrigerate for at least 10 minutes to set slightly.
Step 2: Prepare the Cookie “Dirt”
- Place the chocolate sandwich cookies in a zip-top bag and crush them using a rolling pin or food processor until they resemble fine dirt.
- Set aside about 1/4 cup for final topping.
Step 3: Create the Cookie Tombstones
- Melt a small amount of chocolate or use black decorating gel.
- Write “R.I.P.” or spooky names (like “BOO” or “EEK”) on the top half of each cookie.
- Allow the writing to set (pop them in the fridge for a few minutes if needed).
Step 4: Assemble the Pudding Cups
- Spoon a layer of chocolate pudding into the bottom of each cup.
- Add a layer of cookie crumbs (“dirt”) over the pudding.
- Repeat the layers until the cup is nearly full, finishing with cookie crumbs on top.
- Insert a decorated cookie tombstone into the back of each cup.
- Add candy pumpkins, gummy worms, or bones around the tombstone to complete the spooky graveyard look.
Step 5: Chill Before Serving
- Place the assembled cups in the refrigerator for at least 30 minutes to firm up before serving.

How to Serve
Serve chilled with small spoons so each guest can dig through the “dirt” to uncover the pudding treasure beneath.
Perfect for:
- Halloween dessert tables
- Kids’ parties or school events
- Potluck spreads
- Movie nights featuring Halloween classics
Serve on a spooky tray decorated with cobwebs or mini skeleton hands for full effect!
Recipe Tips
- Smooth pudding layer: Chill pudding slightly before layering to prevent it from being too runny.
- Extra crunch: Add crumbled brownies or chocolate chips between layers.
- Make it green: Use pistachio pudding for a “slime graveyard” twist.
- Stabilize tombstones: Insert them at an angle or deeper into the pudding so they stand upright.
- Decorating fun: Let kids add their own toppings — they’ll love designing their own “graves.”
Variations
- Vegan Version:
Use plant-based pudding mix, almond milk, and dairy-free whipped topping. Choose vegan cookies. - Peanut Butter Graveyard:
Add a layer of peanut butter mousse or drizzle peanut butter between pudding layers. - Minty Graveyard:
Add a few drops of peppermint extract to the pudding and sprinkle crushed mint cookies. - Pumpkin Patch Cups:
Use vanilla pudding dyed orange and top with candy pumpkins instead of tombstones. - Cookies & Cream Version:
Layer vanilla pudding with crushed Oreos for a lighter but equally spooky dessert.
Freezing & Storage
- To Store: Keep covered in the refrigerator for up to 3 days.
- To Freeze: Not recommended — pudding and whipped topping don’t freeze well (they become grainy when thawed).
- Make Ahead: You can make pudding and cookie dirt up to 1 day in advance, but assemble cups the day of serving for best texture.
Special Equipment Needed
- Mixing bowls
- Whisk
- Rolling pin or food processor (for crushing cookies)
- Clear dessert cups or jars
- Small piping bag or toothpick (for writing on cookies)
Conclusion
These Haunted Graveyard Chocolate Pudding Cups with Cookie Tombstones are the ultimate Halloween dessert — equal parts spooky, creamy, and irresistibly chocolatey. They’re a visual treat that delights the eyes before the first bite even happens.
Perfect for parties, school events, or a cozy Halloween movie night, these pudding cups bring festive fun and delicious flavor to your table with almost no effort. Every spoonful delivers a hauntingly good mix of creamy pudding, crumbly “dirt,” and sweet surprises.
Haunted Graveyard Chocolate Pudding Cups with Cookie Tombstones
These Haunted Graveyard Chocolate Pudding Cups with Cookie Tombstones are the perfect blend of creepy and delicious — a must-have treat for your Halloween celebrations! Layers of rich, creamy chocolate pudding, crushed chocolate cookies (“dirt”), and adorable cookie tombstones create a fun and eerie mini dessert that looks like a spooky graveyard scene straight out of a Halloween movie.
Ingredients
For the Chocolate Pudding:
For the “Dirt” Layer:
For the Tombstones & Decorations:
For Serving:
Instructions
-
Step 1: Make the Chocolate Pudding : In a medium bowl, whisk the chocolate pudding mix and cold milk together for 2 minutes until smooth and thickened. Gently fold in the whipped topping to make it lighter and creamier. Refrigerate for at least 10 minutes to set slightly.
-
Step 2: Prepare the Cookie “Dirt” : Place the chocolate sandwich cookies in a zip-top bag and crush them using a rolling pin or food processor until they resemble fine dirt. Set aside about 1/4 cup for final topping.
-
Step 3: Create the Cookie Tombstones : Melt a small amount of chocolate or use black decorating gel. Write “R.I.P.” or spooky names (like “BOO” or “EEK”) on the top half of each cookie. Allow the writing to set (pop them in the fridge for a few minutes if needed).
-
Step 4: Assemble the Pudding Cups : Spoon a layer of chocolate pudding into the bottom of each cup. Add a layer of cookie crumbs (“dirt”) over the pudding. Repeat the layers until the cup is nearly full, finishing with cookie crumbs on top. Insert a decorated cookie tombstone into the back of each cup. Add candy pumpkins, gummy worms, or bones around the tombstone to complete the spooky graveyard look.
-
Step 5: Chill Before Serving : Place the assembled cups in the refrigerator for at least 30 minutes to firm up before serving.