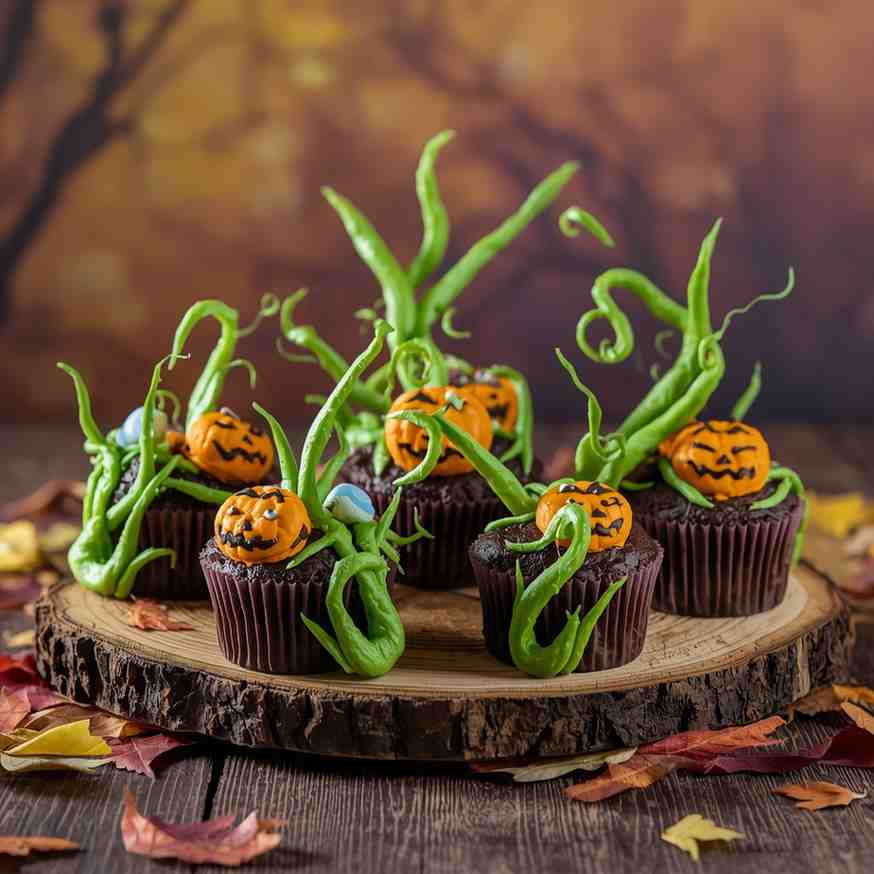
There’s something irresistibly magical about fall—cool breezes, cozy sweaters, and, of course, pumpkin-flavored everything! These Haunted Pumpkin Patch Cupcakes perfectly capture the essence of the season with moist, spiced pumpkin cupcakes topped with creamy orange-tinted frosting and whimsical green frosting vines that turn each cupcake into a tiny edible pumpkin patch. Whether you’re hosting a Halloween party, a fall harvest gathering, or simply craving something festive, these cupcakes are a treat for the eyes and the taste buds.
The “haunted” touch comes from using mini chocolate cookie “dirt,” candy pumpkins, and eerie green frosting vines that make it look like pumpkins are growing right out of the soil. It’s spooky, sweet, and delightfully creative—a true showstopper for Halloween dessert tables.
Why I Love This Recipe
I adore this recipe because it blends warm autumn spices with playful Halloween artistry. Every bite bursts with cozy pumpkin flavor balanced by the smooth sweetness of the frosting. It’s a fun project for both adults and kids—perfect for decorating together before a Halloween movie night.
Plus, the combination of moist pumpkin cupcakes, silky frosting, and crunchy cookie crumbs delivers layers of texture and flavor that keep you coming back for more. It’s more than just dessert—it’s an experience that captures the spirit of the season.
Why It’s a Must-Try Dish
- Festive & Eye-Catching: The cute “pumpkin patch” design makes it ideal for Halloween or fall parties.
- Rich Autumn Flavor: Pumpkin puree, cinnamon, nutmeg, and cloves bring authentic seasonal warmth.
- Easy to Customize: You can vary the toppings, frosting colors, or add fillings.
- Kid-Friendly Fun: Kids love helping decorate the vines and “plant” the candy pumpkins!
Preparation & Cooking Time
- Preparation Time: 25 minutes
- Cooking Time: 20 minutes
- Cooling & Decorating Time: 30 minutes
- Total Time: 1 hour 15 minutes
Servings & Nutrition
- Servings: 12 cupcakes
- Calories: ~320 kcal per cupcake (including frosting and decorations)
Course & Cuisine
- Course: Dessert
- Cuisine: American (Halloween / Fall-themed)
Ingredients
For the Pumpkin Cupcakes:
- 1 ½ cups all-purpose flour
- 1 tsp baking powder
- ½ tsp baking soda
- ½ tsp salt
- 1 ½ tsp ground cinnamon
- ½ tsp ground nutmeg
- ¼ tsp ground cloves
- ¾ cup pumpkin puree (not pumpkin pie filling)
- ½ cup light brown sugar, packed
- ½ cup granulated sugar
- ½ cup vegetable oil (or melted butter)
- 2 large eggs
- 1 tsp vanilla extract
- ¼ cup milk or buttermilk
For the Frosting:
- 1 cup unsalted butter, softened
- 3 cups powdered sugar
- 2 tbsp heavy cream or milk
- 1 tsp vanilla extract
- A few drops of orange food coloring (for pumpkin color)
- A few drops of green food coloring (for vines)
For Decoration:
- 12 candy pumpkins (such as Brach’s mellowcreme pumpkins)
- 6 chocolate sandwich cookies, crushed into crumbs (for “dirt”)
- Optional: Green licorice strings or candy vines for extra texture
Cooking Directions
Step-by-Step Preparation
Step 1: Preheat the Oven
Preheat your oven to 350°F (175°C) and line a 12-cup muffin tin with paper cupcake liners.
Step 2: Mix Dry Ingredients
In a medium bowl, whisk together flour, baking powder, baking soda, salt, cinnamon, nutmeg, and cloves. Set aside.
Step 3: Mix Wet Ingredients
In a large bowl, whisk together pumpkin puree, both sugars, oil, eggs, vanilla, and milk until smooth and well combined.
Step 4: Combine Wet and Dry
Gradually add the dry ingredients to the wet mixture. Stir just until combined—don’t overmix, or the cupcakes will be dense.
Step 5: Fill the Cupcake Liners
Divide the batter evenly among the 12 liners, filling each about ¾ full.
Step 6: Bake
Bake for 18–20 minutes or until a toothpick inserted into the center comes out clean.
Cool in the pan for 5 minutes, then transfer to a wire rack to cool completely.
Step 7: Prepare the Frosting
In a large mixing bowl, beat softened butter until creamy (about 2 minutes).
Gradually add powdered sugar, mixing on low speed.
Add vanilla and cream, then beat until light and fluffy.
- Transfer ⅓ of the frosting to a small bowl and tint it green for the vines.
- Tint the remaining ⅔ of frosting orange for the pumpkin base.
Step 8: Decorate
- Frost each cupcake with the orange frosting using a spatula or piping bag.
- Sprinkle a little cookie crumb “dirt” on top of each.
- Place one candy pumpkin in the center.
- Using a piping bag fitted with a small round or leaf tip, pipe green frosting vines and leaves around the pumpkin to resemble a patch.

How to Serve
Serve these cupcakes at room temperature on a festive Halloween platter. You can also place them in individual cupcake boxes for party favors. They pair wonderfully with apple cider, hot chocolate, or pumpkin spice latte for the ultimate fall treat.
Recipe Tips
- Room Temperature Ingredients: Ensure butter and eggs are at room temperature for better mixing.
- Smooth Frosting: Beat frosting on high for 2–3 minutes for extra fluffiness.
- Piping Control: Use a small piping tip (like Wilton #2 or #3) for more realistic vines.
- Make Ahead: Cupcakes can be baked a day ahead and frosted just before serving.
Variations
- Chocolate Pumpkin Patch: Add 2 tbsp cocoa powder to the batter for a richer, chocolaty version.
- Cream Cheese Frosting: Substitute half the butter with cream cheese for tangier flavor.
- Mini Version: Make mini cupcakes for bite-sized party treats.
- Haunted Forest Edition: Use gummy worms or candy eyes for a spookier presentation.
Freezing & Storage
- Storage: Store cupcakes in an airtight container at room temperature for 2 days or in the refrigerator for up to 5 days.
- Freezing:
- Freeze unfrosted cupcakes for up to 2 months.
- Thaw at room temperature, then frost and decorate before serving.
- Avoid freezing decorated cupcakes, as the candy pumpkins may lose texture.
Special Equipment Needed
- 12-cup muffin tin
- Paper cupcake liners
- Electric hand or stand mixer
- Piping bags
- Small round or leaf piping tips
- Mixing bowls and spatulas
Conclusion
These Haunted Pumpkin Patch Cupcakes with Green Frosting Vines are a perfect blend of creativity, flavor, and Halloween spirit. The moist pumpkin cupcakes, topped with rich frosting and playful decorations, make them both delicious and delightful to look at. Whether you’re baking for a Halloween bash, a fall bake sale, or simply to celebrate pumpkin season, this recipe is sure to impress and enchant everyone who takes a bite.
They’re not just cupcakes—they’re tiny edible pumpkin patches that bring joy and a touch of magic to your table!
Haunted Pumpkin Patch Cupcakes with Green Frosting Vines
There’s something irresistibly magical about fall—cool breezes, cozy sweaters, and, of course, pumpkin-flavored everything! These Haunted Pumpkin Patch Cupcakes perfectly capture the essence of the season with moist, spiced pumpkin cupcakes topped with creamy orange-tinted frosting and whimsical green frosting vines that turn each cupcake into a tiny edible pumpkin patch.
Ingredients
For the Pumpkin Cupcakes:
For the Frosting:
For Decoration:
Instructions
-
Step 1: Preheat the Oven : Preheat your oven to 350°F (175°C) and line a 12-cup muffin tin with paper cupcake liners.
-
Step 2: Mix Dry Ingredients :In a medium bowl, whisk together flour, baking powder, baking soda, salt, cinnamon, nutmeg, and cloves. Set aside.
-
Step 3: Mix Wet Ingredients : In a large bowl, whisk together pumpkin puree, both sugars, oil, eggs, vanilla, and milk until smooth and well combined.
-
Step 4: Combine Wet and Dry : Gradually add the dry ingredients to the wet mixture. Stir just until combined—don’t overmix, or the cupcakes will be dense.
-
Step 5: Fill the Cupcake Liners : Divide the batter evenly among the 12 liners, filling each about ¾ full.
-
Step 6: Bake : Bake for 18–20 minutes or until a toothpick inserted into the center comes out clean.
-
Cool in the pan for 5 minutes, then transfer to a wire rack to cool completely.
-
Step 7: Prepare the Frosting : In a large mixing bowl, beat softened butter until creamy (about 2 minutes). Gradually add powdered sugar, mixing on low speed.
-
Add vanilla and cream, then beat until light and fluffy. Transfer ⅓ of the frosting to a small bowl and tint it green for the vines. Tint the remaining ⅔ of frosting orange for the pumpkin base.
-
Step 8: Decorate : Frost each cupcake with the orange frosting using a spatula or piping bag. Sprinkle a little cookie crumb “dirt” on top of each. Place one candy pumpkin in the center. Using a piping bag fitted with a small round or leaf tip, pipe green frosting vines and leaves around the pumpkin to resemble a patch.